このエントリは JavaFX Advent Calendar 2017 の 19 日目のエントリです。前日は id:planet-az さんによる「 簡単なミュージックプレーヤーをさらにいじってみた 」でした。
はじめに
今回取り上げるのは、 JSR 380 Bean Validation 2.0 の JavaFX 対応についてです。そうです、Java EE に含まれる Bean Validation が JavaFX に対応したのです! まさか EE の仕様が JavaFX のことを考慮するとは思わなかったので、これは非常に驚きました。
具体的には JavaFX のプロパティ API に対して Bean Validation が対応しました。このエントリではその使い方について紹介したいと思います。
Bean Validation 2.0 について
Bean Validation 2.0 は Java EE 8 に含まれる仕様です。以下の Web サイトに Specification がまとめられています。
http://beanvalidation.org/2.0/spec/
新機能の 1 つとして次のようなものが挙げられています。
- Support for validating container elements by annotating type arguments of parameterized types, e.g. List<@Positive Integer> positiveNumbers (see Container element constraints); this also includes:
- More flexible cascaded validation of collection types; e.g. values and keys of maps can be validated now: Map<@Valid CustomerType, @Valid Customer> customersByType
- Support for java.util.Optional
- Support for the property types declared by JavaFX
- Support for custom container types by plugging in additional value extractors (see Value extractor definition)
新たにコンテナ要素のバリデーションに対応しているとあります。コレクションや Optional オブジェクトなどの中身に対してバリデーションを掛けられるようになったのです。そしてこの対応の一環として、 JavaFX のプロパティもデフォルトで対応するようになったのです。 *1
JavaFX アプリケーションでの Bean Validation の使い方
それでは早速使ってみます。折角 JavaFX を使っているので、バインドを活用してみることにします。
作成するサンプルアプリケーション
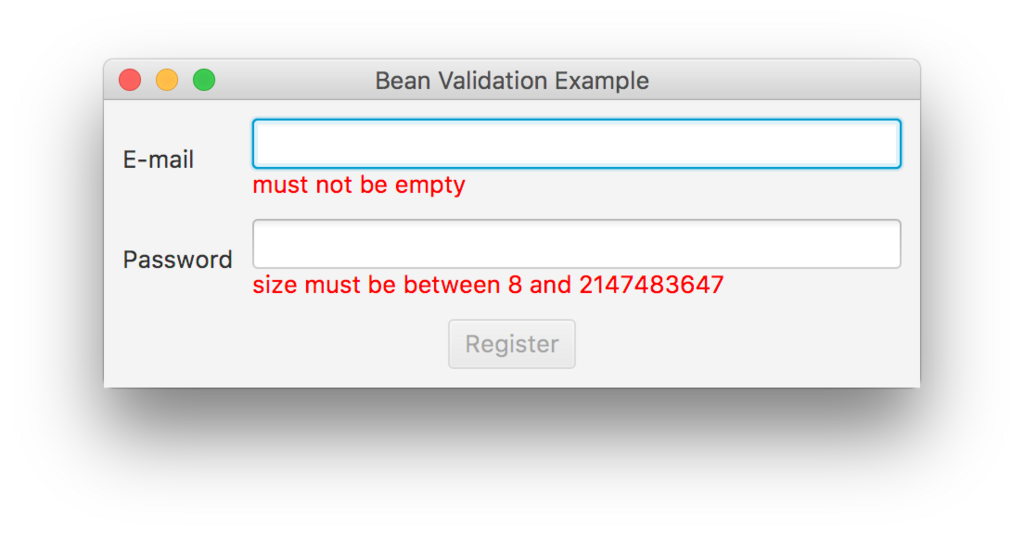
作ってみるのは次のようなユーザ登録フォームを想定したものです。

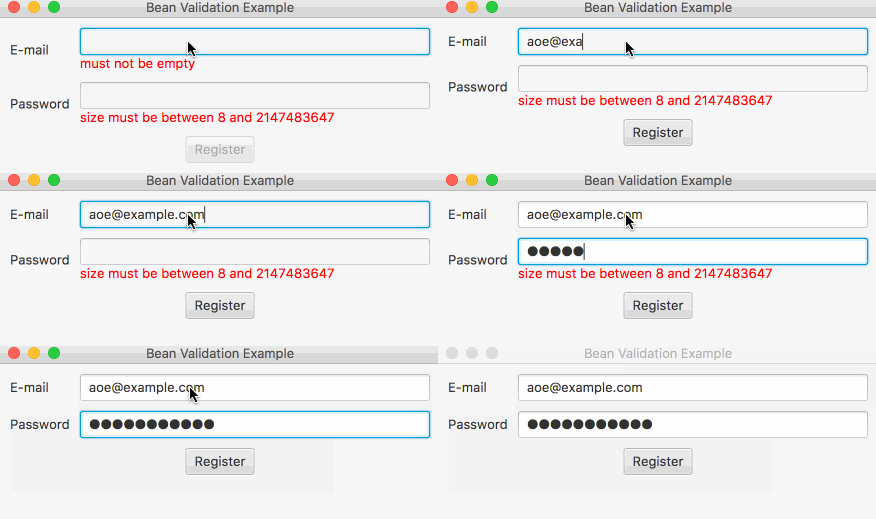
テキストフィールドに文字を打ち込むたびにバリデーションを行い、正しい文字列が入力されたタイミングでエラーメッセージが消えるようになります。E-mail、パスワードどちらも OK になれば登録ボタンがクリック可能になります。

E-mail 欄のバリデーションには Bean Validation 2.0 で新たに入った @Email を使ってみることにします。
依存性の設定
まず、JavaFX アプリケーションで Bean Validation を使えるようにします。参照実装である Hibernate Validator を使います。Maven だと pom.xml に次のように依存設定を記述します。
<?xml version="1.0" encoding="UTF-8"?>
<project xmlns="http://maven.apache.org/POM/4.0.0"
         xmlns:xsi="http://www.w3.org/2001/XMLSchema-instance"
         xsi:schemaLocation="http://maven.apache.org/POM/4.0.0 http://maven.apache.org/xsd/maven-4.0.0.xsd">
    <modelVersion>4.0.0</modelVersion>

<%-- Snip --%>

    <dependencies>
        <dependency>
            <groupId>org.hibernate.validator</groupId>
            <artifactId>hibernate-validator</artifactId>
            <version>6.0.4.Final</version>
        </dependency>
        <dependency>
            <groupId>org.glassfish</groupId>
            <artifactId>javax.el</artifactId>
            <version>3.0.0</version>
        </dependency>
    </dependencies>

<%-- Snip --%>

</project>
Model、FXML の実装
Model のコードは次のようになります。
package aoetk.sample.beanvalidation;

import javafx.beans.property.SimpleStringProperty;
import javafx.beans.property.StringProperty;

import javax.validation.constraints.Email;
import javax.validation.constraints.NotEmpty;
import javax.validation.constraints.Size;

public class Model {
    @NotEmpty
    @Email
    private StringProperty email = new SimpleStringProperty("");

    @Size(min = 8)
    private StringProperty password = new SimpleStringProperty("");

    public String getEmail() {
        return email.get();
    }

    public StringProperty emailProperty() {
        return email;
    }

    public void setEmail(String email) {
        this.email.set(email);
    }

    public String getPassword() {
        return password.get();
    }

    public StringProperty passwordProperty() {
        return password;
    }

    public void setPassword(String password) {
        this.password.set(password);
    }
}
フィールドに着目してください。このように JavaFX プロパティに対して直接 Bean Validation のアノテーションを指定可能になっています。
次に View としての FXML のコードを示します。
<?xml version="1.0" encoding="UTF-8"?>

<%-- import略 --%>
<GridPane hgap="10.0" vgap="10.0" xmlns="http://javafx.com/javafx" xmlns:fx="http://javafx.com/fxml/1" fx:controller="aoetk.sample.beanvalidation.Controller">
   <rowConstraints>
      <RowConstraints minHeight="10.0" />
      <RowConstraints minHeight="10.0" />
      <RowConstraints minHeight="10.0" />
   </rowConstraints>
   <columnConstraints>
      <ColumnConstraints hgrow="NEVER" minWidth="10.0" />
      <ColumnConstraints hgrow="ALWAYS" minWidth="10.0" />
   </columnConstraints>
   <children>
      <Label text="E-mail" />
      <Label text="Password" GridPane.rowIndex="1" />
      <Button fx:id="registerButton" mnemonicParsing="false" text="Register" GridPane.columnSpan="2" GridPane.halignment="CENTER" GridPane.rowIndex="2" />
      <VBox GridPane.columnIndex="1">
         <children>
            <TextField fx:id="emailField" prefHeight="27.0" prefWidth="350.0" />
            <Label fx:id="emailErrorLabel" text="Label" textFill="red" />
         </children>
      </VBox>
      <VBox GridPane.columnIndex="1" GridPane.rowIndex="1">
         <children>
            <PasswordField fx:id="passwordField" />
            <Label fx:id="passwordErrorLabel" text="Label" textFill="red" />
         </children>
      </VBox>
   </children>
   <padding>
      <Insets bottom="10.0" left="10.0" right="10.0" top="10.0" />
   </padding>
</GridPane>
Scene Builder で見ないとちょっと分かりにくいかも知れませんね。入力フィールドに加え、エラーメッセージについても fx:id 属性を与えて Controller 側でアクセスできるようにしている点に注目してください。
Controller でのバインド、バリデーション実装
そして、この Model と View を Controller でバインドし、さらにフィールドに対して入力が発生した場合にバリデーションが実行されるようにします。
// (import略)
public class Controller implements Initializable {
    @FXML
    Label emailErrorLabel;

    @FXML
    Label passwordErrorLabel;

    @FXML
    Button registerButton;

    @FXML
    TextField emailField;

    @FXML
    PasswordField passwordField;

    private StringProperty emailMessage = new SimpleStringProperty("");

    private StringProperty passwordMessage = new SimpleStringProperty("");

    private Model model = new Model();

    private Validator validator;

    @Override
    public void initialize(URL location, ResourceBundle resources) {
        final ValidatorFactory validatorFactory = Validation.buildDefaultValidatorFactory();
        validator = validatorFactory.getValidator();
        validateModel();

        emailErrorLabel.textProperty().bind(emailMessage);
        passwordErrorLabel.textProperty().bind(passwordMessage);
        registerButton.disableProperty().bind(emailMessage.isNotEmpty().and(passwordMessage.isNotEmpty()));
        emailErrorLabel.managedProperty().bind(emailMessage.isNotEmpty());
        passwordErrorLabel.managedProperty().bind(passwordMessage.isNotEmpty());
        model.emailProperty().bind(emailField.textProperty());
        model.passwordProperty().bind(passwordField.textProperty());
        emailField.textProperty().addListener(observable -> validateModel());
        passwordField.textProperty().addListener(observable -> validateModel());
    }

    private void validateModel() {
        final Set<ConstraintViolation<Model>> violations = validator.validate(model);
        emailMessage.set("");
        passwordMessage.set("");
        for (ConstraintViolation<Model> violation : violations) {
            if (violation.getPropertyPath().toString().equals("email")) {
                emailMessage.set(violation.getMessage());
            } else if (violation.getPropertyPath().toString().equals("password")) {
                passwordMessage.set(violation.getMessage());
            }
        }
    }
}
initialize() メソッドの最初で Validator オブジェクトを取得している点については特に説明不要ですね。その後すぐに validateMode() メソッドをコールして初期状態でのバリデーションを実行しています。
エラーメッセージは Validator によるバリデーションの結果出力されたメッセージをそのまま使うようにしました。メッセージを格納する StringProperty オブジェクトを Controller のフィールドとして持たせ、それをエラーメッセージの Label とバインドさせています。
mailErrorLabel.textProperty().bind(emailMessage);
PasswordErrorLabel.textProperty().bind(passwordMessage);
また、このメッセージが空文字の場合はボタンをクリック可能にし、エラーメッセージラベルもシーングラフから取り除くようにしました。これも次のようにバインドを活用しています。
(managed プロパティを false 設定すると一時的にシーングラフから取り除かれます)
registerButton.disableProperty().bind(emailMessage.isNotEmpty().and(passwordMessage.isNotEmpty()));
emailErrorLabel.managedProperty().bind(emailMessage.isNotEmpty());
passwordErrorLabel.managedProperty().bind(passwordMessage.isNotEmpty());
そして、テキストボックスやパスワードフィールドの入力内容を Model のプロパティに反映させるためにバインドします。
model.emailProperty().bind(emailField.textProperty());
model.passwordProperty().bind(passwordField.textProperty());
テキストボックスやパスワードフィールドの textProperty をリッスンし、文字列が入力されるたびにバリデーションを発火します。
emailField.textProperty().addListener(observable -> validateModel());
passwordField.textProperty().addListener(observable -> validateModel());
最後にバリデーションを実行する validateModel() の実装を見てみます。モデルに対してバリデーションを実行し、結果として返ってきた ConstraintViolation オブジェクトのプロパティ名をチェックし、対応するプロパティ用のエラーメッセージ StringProperty オブジェクトにメッセージをセットしています。
後はバインドの仕組みで自動的にメッセージ表示/非表示やボタンのクリック可/不可が制御されます。
private void validateModel() {
    final Set<ConstraintViolation<Model>> violations = validator.validate(model);
    emailMessage.set("");
    passwordMessage.set("");
    for (ConstraintViolation<Model> violation : violations) {
        if (violation.getPropertyPath().toString().equals("email")) {
            emailMessage.set(violation.getMessage());
        } else if (violation.getPropertyPath().toString().equals("password")) {
            passwordMessage.set(violation.getMessage());
        }
    }
}
JavaFX のバインドの仕組みを活用することで、プレゼンテーションサイドのロジックがかなり宣言的になっていることが分かると思います。
このようにして先のスクリーンショットに示したような動作を実現しました。
コードの全体は GitHub にアップしています。
https://github.com/aoetk/javafx-beanvalidation-sample
まとめ
以上に示したように、Bean Validation 2.0 では JavaFX のプロパティを対象としたバリデーションが可能になりました。バインドなど JavaFX の機構を活用して、ユーザに対して応答性の良いバリデーションの仕組みを実装できるようになります。
今回はキー入力のタイミングでバリデーションを行ってみましたが、もちろん他にもフォーカスアウトで実行する、(多くの Web アプリのように) ボタンクリックのタイミングで実行する、あるいはバリデーションエラーを受け取ったときは入力をキャンセルしてそもそも入力できない文字は入れられないようにする...などなど色んな実装方法が考えられます。皆さんなりのやり方で色々試してみるといいでしょう。
明日は...まだ埋まっていないな。みんな書いて書いて!